Google has chosen to compete with Outlook in the professional world not by attacking them in front but being an ally.
Thus, several of the flagship applications of Google can be used directly from Outlook. You can access their email (Gmail), calendar and contacts via the Google equivalent of the Microsoft client.
"Many professionals prefer the Gmail interface and functionality to products that they used before. But some love Outlook. For them we developed Google Sync for Microsoft Outlook ", says on the blog on Google.
Objective: To attract more businesses without disrupting users
With Google Apps Sync for Microsoft Outlook, Google allows companies to connect to its cloud messaging (email, calendar, contacts) from Outlook, but without Microsoft Exchange.
Users can keep their email tool. Administration side, Google provides a migration system, presented as a simple implementation, which will copy data from Exchange and Outlook on Google's servers dedicated to Google Apps.
Apart from access to Google's email from Outlook, users can also check their emails from the Gmail interface when not on their workstation. The Google Apps (first version) is sold $ 50 per year per user.
After making its services accessible from Cloud BlackBerries, iPhones and recently Symbian S60 mobile phones, Google is continuing its plan of conquest enterprises. Hoping to convince the passage "outlook addicts" to switch to Google Apps for good.
About switching from Microsoft Schedule+ 1.0 or 7.x
Microsoft Outlook is the email client included with the Microsoft Office suite. It is designed to operate as an independent personal information manager, as an Internet mail client, or in conjunction with the Microsoft Exchange Server for group scheduling, email, and task management. It manages email, calendars, contacts, tasks, to-do lists, and documents or files on the hard drive. Outlook helps you communicate through email, phone support, and group scheduling capabilities. Outlook also helps you share information by means of public folders, forms, and Internet connectivity.
Outlook juggles scheduling, group ware, personal information (contacts, tasks), email, and documents all in one place, and allows you to create and view information using a consistent interface.
You can find information easily with Windows shortcuts, which let you navigate to any private, public, or file system folders. Outlook Journal helps you find a document based on creation date and name.
After you set up Microsoft Outlook, you can import the contents of the Microsoft Schedule+ data file (file name extension .scd if you use Schedule+ 7.x, .cal if you use Schedule+ 1.0). The Schedule+ file stores your appointments, events, meetings, to-do list, and contacts (Schedule+ 7.x only). The .scd or .cal file is not modified or deleted during the import process. See your system administrator before you set up Outlook for use with Schedule+ files. Outlook 2002 and later does not support Schedule+ as a Primary Calendar, so in order to view your Schedule+ data files you must import them into Outlook.
Outlook imports the following types of Schedule+ data into the following Outlook folders:
- Appointments and events are imported into the Calendar folder.
- Tasks are imported into the Tasks folder.
- Contacts (Schedule+ 7.x only) are imported into the Contacts folder.
- Notes (Schedule+ 1.0 only) must first be imported into Schedule+ 7.x, where they are converted to events, and then imported from Schedule+ 7.x to Outlook as events in the Calendar folder.
The Outlook 2007 configuration process
Before I show you how to configure Outlook 2007 to connect to Exchange Server 2007, there are a few prerequisites. First, you must have created a couple of user mailboxes. I am also assuming that you have already installed Microsoft Office 2007 on the users' workstations.
Finally, at the time I wrote this tutorial, Exchange Server 2007, Microsoft Office 2007, and Windows Vista were all still in beta testing. That being the case, it is possible that anything I show you here could change by the time that the various products are released.
Configuring Outlook 2007
1. Log into one of your workstations using one of the user accounts for which you have created a mailbox. After logging in, open Microsoft Outlook 2007 to view the Outlook 2007 Startup screen, which is really just a welcome screen for the Setup wizard.
2. Click Next and you will see a screen asking you if you would like to configure an email account. Click the Yes button and then click Next again.
3. You will now be asked if you want to connect to an Exchange, POP3, IMAP, or HTTP server, or if you would rather connect to an Outlook Add-in Connector. Choose the Microsoft Exchange Server option and click Next.
Outlook 2007 will now request a name, email address, and password. (One thing that's worth noting is that Outlook 2007 is prompting you to enter the user's name, not the person's user name.) Before you start typing though, just wait for a few seconds. Assuming that you have your workstation's DNS settings configured correctly, and the user account that you are signed in with has a mailbox, Outlook 2007 should automatically detect the Exchange Server and fill in the necessary information for you.
It usually only takes a few seconds for Outlook to automatically configure itself. If for some reason Outlook configures itself incorrectly or not at all, you do have the option of performing a manual configuration. Notice the Manually Configure Server Settings checkbox in the lower left corner of Figure 24.
5. Assuming that Outlook 2007 has configured itself correctly, click Next to continue.
6. Depending on how your test environment is configured, you might possibly see a message telling you that the certificate issuer for the site is untrusted or unknown. If this were a production environment, it would be a serious issue. Being that our purpose at the moment is to simply take Exchange 2007 and Outlook 2007 for a test drive though, just click "Yes" to ignore the message and continue.
Microsoft Outlook 2007 should now be installed and ready to use.
Finally, at the time I wrote this tutorial, Exchange Server 2007, Microsoft Office 2007, and Windows Vista were all still in beta testing. That being the case, it is possible that anything I show you here could change by the time that the various products are released.
Configuring Outlook 2007
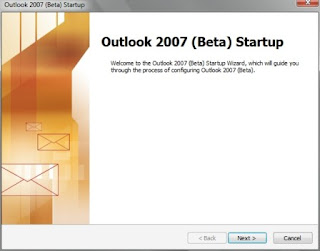
1. Log into one of your workstations using one of the user accounts for which you have created a mailbox. After logging in, open Microsoft Outlook 2007 to view the Outlook 2007 Startup screen, which is really just a welcome screen for the Setup wizard.
Figure: This is Outlook 2007's Welcome screen.

2. Click Next and you will see a screen asking you if you would like to configure an email account. Click the Yes button and then click Next again.
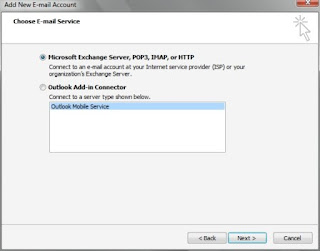
3. You will now be asked if you want to connect to an Exchange, POP3, IMAP, or HTTP server, or if you would rather connect to an Outlook Add-in Connector. Choose the Microsoft Exchange Server option and click Next.
Figure: Choose the Exchange Server, POP3, IMAP, or HTTP option.

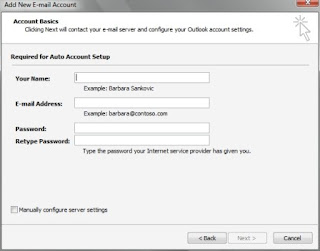
Outlook 2007 will now request a name, email address, and password. (One thing that's worth noting is that Outlook 2007 is prompting you to enter the user's name, not the person's user name.) Before you start typing though, just wait for a few seconds. Assuming that you have your workstation's DNS settings configured correctly, and the user account that you are signed in with has a mailbox, Outlook 2007 should automatically detect the Exchange Server and fill in the necessary information for you.
It usually only takes a few seconds for Outlook to automatically configure itself. If for some reason Outlook configures itself incorrectly or not at all, you do have the option of performing a manual configuration. Notice the Manually Configure Server Settings checkbox in the lower left corner of Figure 24.
Figure: Enter the user's name, email address, and password.

5. Assuming that Outlook 2007 has configured itself correctly, click Next to continue.
6. Depending on how your test environment is configured, you might possibly see a message telling you that the certificate issuer for the site is untrusted or unknown. If this were a production environment, it would be a serious issue. Being that our purpose at the moment is to simply take Exchange 2007 and Outlook 2007 for a test drive though, just click "Yes" to ignore the message and continue.
Microsoft Outlook 2007 should now be installed and ready to use.
Top tips for Outlook
Ever wish you had an Outlook expert at your shoulder while you work. See the following to learn new and faster ways to work in Outlook.
Mail tips
a) Set a reminder to reply to a message Right-click the message you want to set the reminder for, point to Follow Up, and then click Add Reminder. In the Due By list, click the date when you have to complete the reply. In the second list, click a time. In the Flag color list, click the flag color you want, and then click OK.
b) Add your own words to a follow-up flag for a new message Click the Message Flag button and then type the text you want in the Flag to box.
c) Send a message to multiple people without revealing other recipients' identities To send a message to someone without other recipients of the message knowing, use the Bcc line in the message. Bcc stands for blind carbon copy. If you add someone's name to the Bcc line, a copy of the message is sent to that person, but his or her name is not visible to other recipients.
Calendar tips
a) Automatically add holidays to your Calendar On the Tools menu, click Options, click Calendar Options, and then click Add Holidays.
b) Quickly display several days side by side in Calendar In the date picker, drag over the dates that you want to view.
c) Contact meeting attendees with a reminder or other message Open the original meeting request, click the Actions menu, and then click New Message to Attendees.
Contacts tips
a) Quickly dial a phone number for a contact Right-click the contact, and then on the shortcut menu, click Call Contact.
b) Add a new contact from an e-mail message Open the message. In the From field, right-click the name you want to make into a contact. On the shortcut menu, click Add to Outlook Contacts.
* Create a task related to a contact Click the contact, click the Actions menu, and then click New Task for Contact.
Notes tips
a) Send that note fast! Click the note icon in the upper-left corner of the open note and then click Forward.
b) Quickly create a note from text in another program Select the text and drag it onto the Notes button in the Navigation Pane.
Tasks tips
a) Quickly mark a task complete Right-click the task and then click Mark Complete on the shortcut menu.
b) Quickly assign a task Right-click the task, and then on the shortcut menu, click Assign Task and type a name in the To box.
c) Remove a name fast from Other Tasks list To remove a name from the Other Tasks list, right-click the name, and then click Remove from Other Tasks.
Journal tips
a) Try the quick way to open Journal entries To open the item, document, or contact in a Journal entry, double-click the icon in the Journal entry.
b) Quickly record any file in Journal Drag the file from My Computer to Journal view in the Navigation Pane.
Keyboard shortcut tips
a) To show the menu to download pictures, change automatic download settings, or add a sender to the Safe Senders List, press CTRL+SHIFT+W.
b) To switch the Navigation Pane on and off, press ALT+F1.
c)To display the Advanced Find dialog box, press CTRL+SHIFT+F.
Subscribe to:
Posts (Atom)
